比特记账 React 版项目记录
让 React 支持 sass
React 支持 sass 本身需要 node-sass,但node-sass有两个缺点:下载速度慢,本地编译慢。
于是决定改用 dart-sass 代替 node-sass 。但是 React 本事又不支持 dart-sass。经过查阅资料和研究,我发现**npm6.9 有一个新功能:package alias**,它可以骗过 React 假装安装 node-sass,而实际使用的是 dart-sass
| yarn add node-sass@npm:dart-sass
|
导入组件
为了使 react 可以直接用@import "xxx/yyy" 来引入 "src/xxx/yyy"
需要在 jsconfig.json 或 tsconfig.json 中添加如下配置:
| {
"compilerOptions": {
"baseUrl": "src"
},
"include": ["src"]
}
|
配置完成之后 yarn start 重启服务,.scss 和 .tsx 文件就都可以使用这种方法引入了。
使用 styled-components
本项目所有的 scss 全部使用 js 代码生成。使用这个插件的好处是元素的 css 样式直接和元素绑定在一起,不用再为元素添加 css 类名。
安装依赖:
| yarn add styled-components
yarn add @types/styled-components
|
svg symbols
React 自定义 loader 修改 .svg 源文件
用loader 解析 .svg 文件
引入 .svg 图标可以直接将 import 导入的变量作为参数传给 ![]() 的
的 src ,这样实际上是引入的图片,不是标签。但是用这种方法引入的话,修改 .svg 源代码就比较麻烦。比如要修改 svg 的 fill 属性,如果直接修改 svg 的 fill 属性,当 svg 颜色较多时,不具有操作性。本项目使用 svg symbols 的方法引入 .svg 图标。需要用到 svg-sprite-loader 让 webpack 可以解析出 .svg 文件。
这样就只用修改 webpack.config.js 配置,就可以批量需改 .svg 源文件了。
在 React 中,这种方法需要先 eject
| yarn eject # Are you sure you want to eject? This action is permanent.(y/N) y
|
插曲:出现一个小错误
运行 yarn eject 之后,重新运行 yarn start 后报错如下:
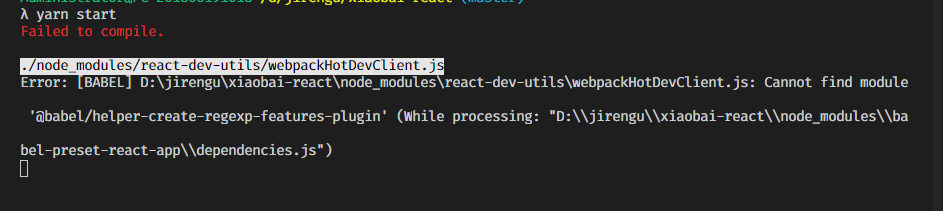
我敏锐的观察到这是因为「Cannot find module」,于是我试运行 yarn add @babel/helper-create-regexp-features-plugin ,bug 迎刃而解了。
当然,这个小 bug 不是重点。
关键是我找到了一个万能的排错语句,记录下来:
| rm -rf node_modules
yarn install
|
之后 src 目录下会多出 config 、scripts 等文件夹。
然后安装 svg-sprite-loader
| yarn add svg-sprite-loader -D
|
svgo-loader 可以更方便的修改 .svg 图标相关属性,也要安装:
然后配置 config/webpack.config.js 文件:
1
2
3
4
5
6
7
8
9
10
11
12
13
14
15
16
17
18
19
| module:{
rules:[
{
oneOf:[
{
test:/\.svg$/,
use:[
{loader:'svg-sprite-loader',options:{}},
{loader:'svgo-loader',options:{
plugins:[
{removeAttrs: {attrs: 'fill'}}
]
}}
]
}
]
}
]
}
|
配置完成需要重新 yarn start 。
然后就可以使用 svg symbols 方法引入 .svg 了。
引入单个 .svg 文件
| require("icons/money.svg");
const Nav = () => {
return (
<ul>
<li>
<svg fill="red">
<use xlinkHref="#money"/>
</svg>
<Link to="/money">记账</Link>
</li>
</ul>
);
};
|
一个 bug
我发信每次 import 之后必须要使用引入的变量(比如控制台打印变量)才可以用 svg symbols 方法引入 .svg 。 若 import 之后的 js 代码中又没有使用 import 引入的变量,则元素不会被渲染。
这显然很麻烦,而且控制台打印变量没有任何实际意义,代码也变得不易读。
查阅资料发现,import引入变量具有 Tree Shaking 特性,webpack 打包时会将没有使用的变量删除,从而不会得到编译出所需要的变量。
新的 webpack 4 正式版本,扩展了这个检测能力,通过 package.json 的 "sideEffects" 属性作为标记,向 compiler 提供提示,表明项目中的哪些文件是 “pure(纯的 ES2015 模块)”,由此可以安全地删除文件中未使用的部分。
解决方法是使用 require() 引入,原理是 require 方法不遵循 Tree Shaking。
优化:一次性引入所有的 .svg 文件
项目中引入了三个 .svg 文件,使用了三次 require() 。出于优化考虑,希望以后都可以直接将所有 icon 一次性引入,不用那么麻烦的一个一个引入。搜索相关资料,最终找到了解决办法。
首先要安装 ts 依赖:
| yarn add --dev @types/webpack-env
|
然后就可以使用 TypeScript 引入了
1
2
3
4
5
6
7
8
9
10
11
12
13
14
15
16
17
18
19
| import React from "react";
let importAll = (requireContext: __WebpackModuleApi.RequireContext) => requireContext.keys().forEach(requireContext);
try {
importAll(require.context('icons', true, /\.svg$/));
} catch (error) {
console.log(error);
}
type Props = { name:string };
const Icon = (props:Props) => {
return (
<svg className="icon">
<use xlinkHref={"#" + props.name}/>
</svg>
);
};
|
点击 output 屏幕触发显示计算器面板
之前使用 Vue 开发的 BitByBit 中,记账页面感觉有些拥挤,同时感觉 UI 有点单调,因此这次使用 React 我想增加一点空间,于是将收入和支出放到了一个下拉列表中。计算器面板则使用点击 output 触发显示的方法:将显示计算结果和唤醒计算器面板封装在 CalculatorOutput 组件中。
父组件:
1
2
3
4
5
6
7
8
9
10
11
12
13
14
15
16
17
18
| function Money() {
const [displayCalculator, setDisplayCalculator] = useState(false);
const displayPad = useCallback(() => {
setDisplayCalculator(() => true);
}, []);
return (
<Layout>
<CalculatorOutput
displayCalculatorPad = {Props.displayCalculatorPad}
output = {Props.output}
/>
{displayCalculator && <CalculatorPad/>}
</Layout>
);
}
export default Money;
|
CalculatorOutput .tsx:
| type Props ={
displayCalculatorPad:()=>void,
output:string
}
const CalculatorOutput:React.FC<Props> = (Props:Props)=>{
return (
<div className="output" onClick={()=> {
Props.displayCalculatorPad();
}}>
{Props.output}
</div>
);
}
export default CalculatorOutput;
|
计算器面板无法紧贴底部
记账页面布局并不能随移动端长度变化而变化。预期是希望计算器面板总是紧贴底部的,我希望多出来的部分全部添加到 TagsSelection 组件上,即使用 flex-grow: 1; 。但是尽管 Layout 组件的 display 是 flex,而包裹所有组件的直接父元素是 Main,它的 display 为 block。因此必须首先给 Main 添加 display:flex; 。
一种方法是直接给 Layout 传入 className 参数,然后用外部 css 修改 Main 的 display。
不过我从一开始就不想使用外部 css ,因为这样之后命名比较麻烦,而且名字比较冗余,
于是我查阅 styled-components 官方文档,看有没有可以对自有组件进行二次封装的方法。
果然是有的:
首先还是要给 Layout 传 className 参数:
Layout.tsx:
| const Layout = (props: any) => {
return (
<div>
<Wrapper>
<Main className={props.className}>
{props.children}
</Main>
<Nav/>
</Wrapper>
</div>
);
};
|
然后对 Layout 进行二次封装:
MyLayout:
| const MyLayout = sytled(Layout)`
display:flex;
flex-direction:column;
`;
|
然后就可以使用 MyLayout 了:
Monty.tsx:
| function Money() {
return (
<MyLayout>
<RecordSelection
displayCalPad={displayPad}
output={"100"}
/>
<NoteSection/>
<TagsSelection/>
displayCalculator && <CalculatorPad/>
</MyLayout>
);
}
|
将 TagSelection 的 flex-grow 设为 1 即可。
| const TagsSelectionWrapper = styled.section`
flex-grow: 1;
`;
|
一开始我选择使用受控模式监听 input 输入变化:
1
2
3
4
5
6
7
8
9
10
11
12
13
14
15
16
17
18
19
20
21
| const NoteSection: React.FC = () => {
const [note, setNote] = useState("");
console.log(note);
return (
<Wrapper>
<label>
<span>备注</span>
<input
type="text"
placeholder="此处添加备注"
value={note}
onChange={e => {
setNote(() =>
e.target.value
);
}}
/>
</label>
</Wrapper>
);
};
|
这样就可以实时监听输入端的变化了,但是总觉实时监听没什么必要,因为用户目的是记录每一笔流水,那么备注就只用在移出焦点时做一次监听就好了。于是后来我又改为使用非受控模式的监听来实现这一过程。
1
2
3
4
5
6
7
8
9
10
11
12
13
14
15
16
17
18
19
20
21
22
23
24
25
26
| const NoteSection: React.FC = () => {
const [note, setNote] = useState("");
const refInput = useRef<HTMLInputElement>(null);
const currentInput = refInput.current;
const onBlur = () => {
if (currentInput) {
setNote(() =>
currentInput.value
);
}
};
return (
<Wrapper>
<label>
<span>备注</span>
<input
type="text"
placeholder="此处添加备注"
defaultValue={note}
ref={refInput}
onBlur={onBlur}
/>
</label>
</Wrapper>
);
};
|
在写完非受控模式的监听后,我发现了一个有意思的事:
HTML 的 onChange 是在鼠标移出(失去焦点)时触发的。
而 React 的 onChange 就是其字面意思:改变即触发(实时监听)。
也就是说:HTML 的 onChange 事件实际对应的是 React 的 onBlur 事件。
自定义 Hooks 要命名为 “useXXX”
在抽离 Tags 组件时,一开始我没有使用 “useXXX” 格式命名,导致报错:

原因是 react 规定,useState 只能在函数组件或者自定义 Hooks 中使用。函数组件要使用 首字母大写命名,自定义 Hooks 要以 “use” 开头,不能使用其他的驼峰命名方法。因此将 createTags 改名为 useTags 就好了:
| import {useState} from "react";
const useTags = () => {
const [tags, setTags] = useState<string[]>(["衣服", "吃饭", "住房", "出行"]);
return {tags, setTags};
};
export {useTags};
|
Tags 无法直接修改,在对其进行操作前,必须先进行深拷贝:
| const tagsClone = JSON.parse(JSON.stringify(tags));
|
页面跳转上一页
为了达到回退指定页面的目的,本项目中,我采用把编辑页面两个回退 Icon 的 link 写死的方式完成。
但是编辑标签页面点击 删除标签 按钮,我使用的是回退上一页的方法处理的:
前期直接使用浏览器提供的方法:
| const onClickBack = () => {
window.history.back();
};
|
查阅了 react-router-dom 文档之后,改用其封装好的 api 处理:
| import {useHistory} from "react-router-dom";
const history = useHistory();
const onClickBack = () => {
history.goBack();
};
|
第一次刷新更行不执行代码
添加标签有一个 bug:当 localstorage 最开始为空数组时,useEffect 会在 undefined 变为 [] 时,执行一次 setTags() ;然后在 [] 变为 tags 时执行一次 setTags() 。显然第一次执行是不必要的,而且有时的确会出现tags 为空白的情款,为此,我单独度封装了一个自定义 hooks ,控制第一次更新不执行 setTags() 。
| import {useEffect, useRef} from "react";
export const useUpdate = (fn:()=>void, deps:any[]) => {
const count = useRef(0);
useEffect(() => {
count.current += 1;
});
useEffect(() => {
if (count.current > 1) {
fn();
}
}, deps);
};
|
自定义 prompt 组件
为了解决微信无法使用 window.prompt ,我单独封装了 OhMyPrompt 组件:
OhMyPrompt.tsx:
1
2
3
4
5
6
7
8
9
10
11
12
13
14
15
16
17
18
19
20
21
22
23
24
25
26
27
28
29
30
31
32
33
34
35
36
37
38
39
40
41
42
43
44
45
46
47
48
49
50
51
52
53
54
55
56
57
58
59
60
61
62
63
64
65
66
67
68
69
70
71
72
73
74
75
76
77
78
79
80
81
82
83
84
85
86
87
88
89
90
91
92
93
94
95
96
97
98
99
100
101
102
103
104
105
106
107
108
109
110
111
112
113
114
115
116
117
118
119
120
121
122
123
124
125
126
127
128
129
130
131
132
133
134
135
136
137
138
139
140
141
142
143
144
| import styled from "styled-components";
import React, {ChangeEventHandler, useImperativeHandle} from "react";
import {Input} from "./Imput";
const ElemCenter = styled.div`
position: absolute;
top: 0;
left: 0;
display: flex;
width: 100%;
height: 100%;
justify-content: center;
align-items: center;
background: linear-gradient(
to bottom right,
rgba(255, 255, 255, 0.2),
rgba(255, 255, 255, 0.5)
);
backdrop-filter: blur(2px);
&.visibility-false {
display: none;
}
`;
const MyPrompt = styled.div`
background: linear-gradient(to top right, rgba(255, 255, 255, 0.1), rgba(255, 255, 255, 0.5));
width: 300px;
height: 200px;
display: flex;
flex-direction: column;
justify-content: center;
align-items: center;
padding: 20px;
border: solid 1px #c4c3c3;
border-radius: 15px;
backdrop-filter: blur(2px);
text-align: center;
h3{
margin-top: 8px;
margin-bottom: 16px;
}
Label{
padding: 0 34px;
}
> div{
display: flex;
width: 100%;
padding: 16px 48px;
justify-content: space-around;
>button{
padding: 4px 8px;
font-weight: bolder;
&:active {
box-shadow: inset 0 0 5px rgba(0,0,0,0.1);
}
background: yellowgreen;
border-radius: 5px;
}
}
`;
type VisibleProps = {
isOpen: boolean;
} & React.AllHTMLAttributes<any>
function DisplayPrompt(props: VisibleProps) {
return (
<ElemCenter className={`visibility-${props.isOpen} `}>
{props.children}
</ElemCenter>
);
}
type myPromptProps = {
hidePad?: () => void;
newTag: string;
setNewTag: (value: string) => void;
addTag: (string: string) => boolean;
onRef: any;
}
function OhMyPrompt(props: myPromptProps) {
const [display, setDisplay] = React.useState(false);
const {newTag, setNewTag, addTag, onRef} = props;
useImperativeHandle(onRef, () => ({
openMyPrompt: () => {
setDisplay(true);
}
}));
const onAddtag: ChangeEventHandler<HTMLInputElement> = (e) => {
setNewTag(e.target.value);
};
const submitAddTag = () => {
addTag(newTag);
setNewTag("");
};
function closeMyPrompt() {
setDisplay(false);
}
return (
<>
<DisplayPrompt isOpen={display}>
<MyPrompt>
<h3>添加标签</h3>
<Input
label={"标签名"}
type={"text"}
placeholder={"此处添加新的标签名"}
value={newTag}
onChange={onAddtag}/>
<div>
<button
onClick={() => {
closeMyPrompt();
submitAddTag();
}}
>
提交
</button>
<button
onClick={closeMyPrompt}
>
取消
</button>
</div>
</MyPrompt>
</DisplayPrompt>
</>
);
}
export {OhMyPrompt};
|
使用 useRef 和 useImperativeHandle 让父组件可以调用子组件的 openMyPrompt()方法,这样控制弹窗显示的 Button 样式就可以完全由父组件自己设定:
父组件 TagsList.tsx
1
2
3
4
5
6
7
8
9
10
11
12
13
14
15
16
17
18
19
20
21
22
23
24
25
26
27
28
29
30
31
32
33
34
35
36
37
38
39
40
41
42
43
44
45
46
47
| const Button = styled.button`
color:#2a9e78;
font-size: 16px;
font-weight: bolder;
border: 1px solid #2a9e78;
padding: 8px 12px;
background: #f4faff;
border-radius: 10px;
&:active {
box-shadow: inset 0 0 5px rgba(0,0,0,0.1);
color:#00aeff;
background: #d9efff;
}
`;
const TagsList = () => {
const {tags, addTag, deleteTag} = useTags();
const [newTag, setNewTag] = useState("");
const child = useRef();
const onChild = () => {
child.current.openMyPrompt();
};
return (
<Layout>
<TitleWrapper>
<ElementCenter>
<Button
onClick={() => {
onChild();
}}
>
新增标签
</Button>
<OhMyPrompt
newTag={newTag}
setNewTag={setNewTag}
addTag={addTag}
onRef={child}
/>
</ElementCenter>
</Layout>
);
};
export {TagsList};
|